Okonomiyaki

Grilled as you like it

Miso in the mail April 15, 2010

Filed under: Cooking,Eating,Japan — laurel @ 10:49 pm
Tags: , , ,

If you live outside Japan, you might be tempted to believe (due to the selection that’s available at most stores) that miso comes in two varieties: white and red. Well think that no more. Miso, a fermented paste of soy beans, salt, and koji (a special kind of mold that is usually used by inoculating rice or barley), is a delicious and many-flavored thing. There are so many different varieties that vary by regional tastes and traditions. Basically, Kyushu is home to mugi miso made with barley, different varieties of kome miso made with rice are found across Honshu, and Nagoya is the birthplace of the slightly funky-tasting all-soybean Hatcho miso. In addition to color (varying shades of brown, but usually described as white or red) miso can be classified by it’s texture, level of sweetness to saltiness, and flavorfulness. Many misos are associated with the region they originated in: Saikyo (Kyoto), Echigo (Niigata), Edo-mae (Tokyo), Akita, Shinshu (Nagano), Sendai, and the list continues. Most families keep at least two types to mix their own special blend, called awase miso.

A glowing review in the Japan Times led me to Sano Miso in Tokyo’s Kameido neighborhood. I love seeing their rows of miso barrels with their conical lids, ready to be lifted for a whiff of the miso’s fragrance. The sales staff helpfully made recommendations and would mix up quick cups of miso soup so that I could taste and compare the flavors. There are so many varieties, so it’s really necessary to taste a few before you make your decision. In addition to miso, the store stocks other pantry necessities like dried kombu, katsuo flakes, soy sauces, vinegars, and so on. I highly recommend the giant, delicious, and not too sour umeboshi and the jidai mame, peanuts with a sweet, crunchy coating.

At first, I would stop in when I was in Tokyo on other business, but the train ride out to Kameido and back wasn’t exactly quick. On my last visit, I asked if I could get my miso by mail order. What luck, they gave me their catalog and their web address. Not only can I have my miso delivered right to my door, but with shipping all over Honshu just 290 yen, mail order costs less than a round trip on the train. How wonderful!

After poring over the descriptions of each miso (and finishing the miso that I still had from my previous visit to the Kameido store), I prepared my order. I settled on 500 grams each of red Kogane miso, white Kogane miso, Nagasaki mugi miso, and Sendai miso, along with a case of amazake and a few bags of jidai mame. My order arrived just a few days later with a bill to be paid at the convenience store. And the miso? Fantastic–my favorites are the red Kogane miso and Nagasaki mugi miso, both of which are sweet and flavorful. (I have been very happy with all of the miso that I’ve bought from Sano Miso, with the one exception being their Saikyo miso, which seemed too mild and a bit floury tasting.)


500 grams each (left to right) of white Kogane miso, Nagasaki mugi miso, red Kogane miso, and Sendai miso.

I store my miso in 450 mL glass storage jars from Muji (the stackable rectangular shape fits in the refrigerator more efficiently). I was surprised that I could fit 500 grams of miso in a 450 mL container (with room to spare) until I realized that the salt used to produce the miso makes it somewhat more dense than water. Not surprisingly, the saltiest of the four, Sendai miso, takes up the least space.

If you’re interested in ordering some miso for yourself (in Japan of course), start from Sano Miso’s website. Even if you’re Japanese isn’t quite up to snuff, you can do it easily with some help from Google Translate.


Honeymoon Miso Dressing February 10, 2010

Filed under: Cooking,Japan,recipes — laurel @ 10:13 pm
Tags: , , , , , , , ,

I take Japanese lessons on Thursday nights and it’s nearly 7:00 by the time I get home, so I usually ask Alex to make dinner on those nights. A few weeks ago my teacher cancelled our lesson so I wouldn’t have to bicycle there in the cold, raging wind. I asked Alex if there was anything I could do to help with dinner; he said, “I found an interesting looking salad recipe online, so why don’t you make the dressing.” I got out the ingredients and started to measure. “Hey, this recipe looks awfully familiar,” I said, and he answered, “It should, you wrote it.”

It turned out that the recipe was Shiitake and Edamame Salad with White Miso Vinaigrette, which I created for Sunset magazine’s reader recipe contest in 2006. The recipe contest was advertised in the magazine as a chance to win a dream vacation. The prize vacation for the salad category was a trip for two to Kauai. Kauai sounded like a wonderful place, but salad… hasn’t every combination of fruit, vegetable, and dressing already been published? I remembered standing over the blender late one night, measuring spoons in hand, trying to get inspired to create a stellar salad.

I knew I liked honey-miso dressing: seasoned with sesame and a bit of soy sauce, but with its heavy dose of sesame oil, sometimes it tastes a little heavy. I spied a navel orange in the fruit basket. Mmm… citrus and miso, now that sounds good. Into the blender went the orange juice. For the miso, I decided to use just white miso, not a heartier, saltier red miso. I blended those with rice vinegar, honey, and shallot, then drizzled in a mix of vegetable and sesame oil to make a creamy, golden dressing. The rest of the salad, I admit, was just what was in my refrigerator: shiitake mushrooms, leftover edamame, some thinly sliced green onions. I put it together and Alex and I tasted it: pretty good, but it needed some more color. “Baby beet greens,” I wrote in the recipe; it was a long shot. Who even has beet greens anyways? Well, I do in the spring if I’m growing beets, but I certainly didn’t expect that anyone would go out and buy them.

I typed up the recipe, sent it off (as usual, just before the deadline), and forgot all about it. Imagine my surprise when I heard from Sunset’s editors a few months later. I was so excited, and we really did use the prize money to go to Kauai for our honeymoon the next summer.

Alex still loves this dressing, and making our own dressing is cheaper than buying bottled dressing at the store (what a waste!). I’ve made a few improvements over the years. I think the most important thing is to use freshly squeezed orange juice. In fact, if you have the orange’s zest, add that too. I have made the dressing with bottled orange juice, but the flavor just isn’t the same. If you must use bottled juice, add some lemon juice or vinegar to give it a little extra zip. I use Kyoto’s sweet, light, Saikyo miso. I switched from rice vinegar to a milder brown rice vinegar and the dressing was a bit on the sweet side. The balance of acid and sweetness will vary between different vinegars and miso so you’ll have to adjust the amount of honey to your own taste. Finally, less is more with the shallot—the dressing will be thick and have an assertive oniony funk if you add too much. If you don’t have shallot, don’t worry about it, try seasoning the dressing with a bit of ginger or even myoga instead.

I noticed that Sunset recently published a similar very recipe that added tahini and adjusted the amounts of vinegar and honey, so it looks like they’ve been making improvements too.

Back to the other night: since it was vegetari-ish night, we had large servings of the salad for dinner. Alex came up with a great way to add more protein and crunch at the same time. Deep fry sheets of abura-age, drain well, and season lightly with salt. Chopped up, they’re like high-protein croutons (maybe we can call them tofu-tons 😉 ).

Honeymoon Miso Dressing
by Laurel Swift

1 small shallot
1/3 cup freshly squeezed orange juice
2 tablespoons soy sauce
2 tablespoons high-quality rice vinegar
2 scant tablespoons honey
2 tablespoons Saikyo miso
3 tablespoons grapeseed or vegetable oil
3 tablespoons toasted sesame oil
1 tablespoon toasted sesame seeds.

Roughly chop the shallot. Add the shallot to the orange juice, soy sauce, vinegar, honey, and miso. Blend until smooth. Next, drizzle the vegetable and sesame oil into the dressing with the blender running. The dressing should be creamy and slightly thickened. Finally stir in the sesame seeds. This recipe makes a generous cup (about 300 mL) of dressing.

*Tip: I make my dressing with a tall, half-liter measuring beaker and a stick-blender. It’s just the right size and easier to clean than a standard blender.

Honeymoon Miso Salad

1 head butter lettuce, washed and torn into bite-sized pieces
2 sheets abura-age (thin fried tofu)
10 medium shiitake mushrooms, or substitute king oyster, maitake, or other mushrooms
vegetable oil
salt
1/2 cup shelled, cooked edamame (frozen edamame are fine)
3 scallions, sliced thinly on the diagonal
orange segments
Honeymoon Miso Dressing

Fill a pot or wok with vegetable oil about 1-inch deep. The oil should be hot enough to sizzle when you add the abura-age. Cut the abura-age into strips and fry them one sheet at a time until they are crispy. The abura-age will float, so use wooden chopsticks or tongs to flip them. Drain well on paper towels and season lightly with salt.

Slice the mushrooms about 1/4 inch thick. In a frying pan, heat about 1 tablespoon of oil (You can use a bit of the frying oil). Add the mushrooms, season with salt, and cook, stirring occasionally, until browned.

In a large bowl, toss the lettuce with 2 tablespoons of dressing. Pile the dressed greens on large plates. Top with mushrooms, fried abura-age strips, edamame, onions, and oranges. Sprinkle with more sesame seeds and serve the remaining dressing on the side.


Goodbye winter, hello spring April 11, 2009

ishikari-nabe
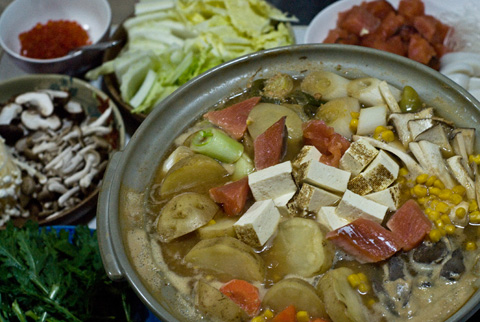
Ishikari nabe – Salmon hotpot with miso broth, potatoes, corn, onion, hakusai, mushrooms, ikura, and more.

The days have turned sunny and warm and the cherry blossoms are blooming prolifically: sure signs that spring has come, although a cold snap a few weeks ago almost had me convinced otherwise. Now that spring is here, it’s time to put away my nabe pot, but if it gets cold and gloomy again (which is not unlikely since spring brings plenty of rainy days too) I’ll turn to my trusty nabe pot to make Ishikari nabe.

Hokkaido is Japan’s northernmost island. It’s cool temperatures and wide open spaces have given it a reputation for great farm products, especially dairy, corn, and root crops like potatoes, onions, and carrots. It’s bountiful seafood like salmon and crab are also famous throughout Japan. Ishikari nabe is a tasty hotpot that combines some of these famous products in a miso broth accented with melted butter. I found this recipe in 自慢の鍋料理 (Jiman no Nabe Ryouri, Proud Nabe Cooking) but made a few changes to suit my taste (like leaving out the shirako and adding more yummy mushrooms). The recipe calls for fresh salmon fillets, but I can usually only find the ready-to-cook salted fillets at my market. I found that these work well too, but make sure to buy the amakuchi (甘口) fillets instead of the karakuchi (辛口) fillets because they are not as salty.

If you’re looking for a nabe cookbook (written in Japanese), I recommend this one. It has three sections featuring regional specialty nabe, all-Japan nabe, and international nabe. Each recipe is identified by the flavor it uses too: miso, shoyu, or tare (plain broth with dipping sauce).

Ishikari Nabe
adapted from Jiman no Nabe Ryouri

500 grams salmon fillets
6 tablespoons ikura
4 large leaves hakusai (napa cabbage)
1 bunch (about 100 grams) shungiku (edible chrysanthemum)
2 naga-negi (or substitute leeks or scallions)
1/3 pack enoki mushrooms
4 shiitake mushrooms
half an ear fresh corn, cut crosswise through the cob into round slices (I used frozen corn kernels instead)
2 potatoes
2/3 block firm tofu
30 grams kuzukiri (kuzu starch noodles)
4 slices kamaboko (steamed fish cake)
butter to taste
1 liter dashi
20 grams red miso
60 grams white miso
shoyu, sake, and mirin to taste (more…)


Ume Jam! (and ume-miso) June 25, 2008

fresh ao-ume

I’ve been seeing lots of lovely green ume (Japanese “plums,” though I’ve heard that they’re actually a type of apricot) at the market lately. I’ve also heard that the season for ume is quite short, so I decided I had better get some to try before they’re gone. I got some inspiration for my ume cook-a-thon while reading on Obachan’s Kitchen & Balcony Garden and Blue Lotus. Last week I had Monday off, so I rode my bicycle to the Shoku-no-Eki (Food Station), a shop that carries a lot of locally grown and produced foods. I picked out a nice looking bag of locally grown ao-ume (“blue ume,” but as you can see they’re really green).

I started by removing the stem-end from the ume and soaking them in salted water. Then I went out to buy some jars. Once I got to the cooking store, I realized that I had better know that I like making jam before I invest in canning jars, so I decided to just freeze my jam in “tupperware” instead.

ume-miso on day 1

Back at home, I started with Obachan’s ume-miso. A 1-pint jar held 6 ume. I weighed the ume to determine how much sugar and miso to use. It turned out that 160 grams each of ume, sugar, and miso filled the jar almost perfectly. After a few days, the ume began to release their juices and the miso and sugar blended together. There was some sugar on the bottom of the jar that hasn’t quite dissolved yet, so if I make ume-miso again, I’ll put in some miso first and then the ume and sugar. I’m not sure exactly what to do with the ume-miso when it’s finished. I’ll start looking for ideas between now and then.

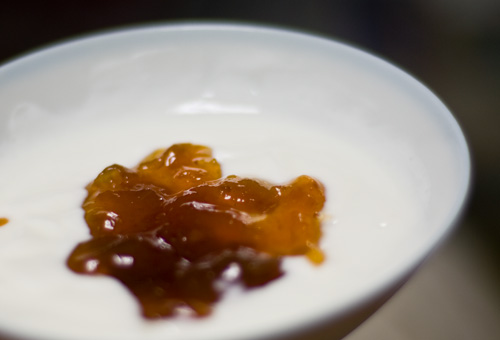
ume jam and yogurt

After ume-miso came the jam. I used Obachan’s recipe and this one that she linked to in her post. I tried my best to read the recipe on the Japanese page, but there may have been some errors in my translation. I wasn’t sure if I should drain the ume after they turned the color of ume-shu’s ume, but in the end it didn’t matter, because by the time I noticed that they had changed color (due to some kitchen multi-tasking) they had become too soft to drain anyways. So I just boiled the jam for a while to evaporate the excess water. In hindsight, I think I should have tried my best to drain them because it took several hours for the jam to thicken to a proper consistency. By the time it did, the jam was no longer a lovely shade of green. In fact, I stopped paying attention for a few minutes so that I could finish making dinner, and the jam at the bottom of the pan had started to caramelize (maybe even to burn?). Oops 😮 Luckily, even though the color is a bit darker than I had hoped for, it doesn’t taste burned at all, and it’s lovely and tart. My favorite way to eat it is stirred into my yogurt for breakfast.

edit: Here’s more about my second (not burned) batch of ume jam.

Ume-miso

about 6 ume (about 160 grams)
160 grams white sugar
160 grams miso

Pack ume into your empty jar to determine how many you can fit in it. My 1-pint jar holds 6 large ume.

Make a 1 cm (approximately) layer of miso in the bottom of a 1-pint jar. Add two ume. Add 1 to 2 cm layer of sugar. Continue to layer sugar, miso and ume until the jar is filled and all of the sugar, miso, and ume are used. Close the jar and wait one month or more until the ume-miso is ready. I am not sure what to do with it next, so I guess there will be more to come on that later…

Ume Jam

900 grams ao-ume (mostly green, not yellow
700 grams sugar (this makes a very tart jam, use more sugar if you like your jam sweeter)

Use a toothpick or wooden skewer to remove the stem end from the ume. It is brown and may be very small, but it does not taste good, so make sure to remove it. Place ume in a large bowl and cover with salted water (I used a tablespoon or so of salt). Soak ume for several hours or overnight.

Place ume in a large pot (I use a heavy cast iron to prevent scorching. If you are careless, even this may not save you. See above) and cover with water. Bring to a boil. Once the water starts to boil and the ume change color slightly, drain them. Return to the pot with a small amount of water and simmer gently. A white froth will form on top as the jam boils. Skim this and discard it. When the ume are soft, you can use a wooden spoon or potato masher to smash them and remove the pits. When the jam thickens to the point that it coats the back of a spoon, it is ready. Allow to cool slightly before putting into containers. I froze mine, but you can can yours in jars if you wish to keep it for longer than a few months.

In case you’re wondering how fresh the ume are at Shoku-no-eki, I saw this fellow making a delivery as I was leaving after my shopping there. As you can see, they work with many smaller farmers.

More ume on Okonomiyaki!


Soup for a rainy day May 18, 2008

Tonjiru – pork and miso soup | Kyoto Bean Soup

In April we had warmer weather and lots of lovely flowers. Of course, we also had plenty of cold, rainy days in April too. It seemed as though the chilly, grey clouds would roll in and hang around for a week at a time, alternating between drizzly, rainy, and threatening. After that, we would get a few days of sunshine (along with terrible humidity) before the next storm came along. Of course, it has been nice most of this week, so I can’t complain too much.

On those grey and rainy days, I found myself thinking of hot, hearty soups to warm myself up. These miso-thickened soups were just the ticket. One difference between my usual soup-making method and a miso-flavored broth is that you have to have a very light hand with the salt. While making my normal soups, I season liberally with salt as soon as I start to saute the carrots, celery, and onions; if I did that for these soups, however, the finished soup would be much too salty. Instead, the seasoning is finished at the end with miso and a small amount of shoyu.

The tonjiru (pork soup) is from Washoku. I follow the recipe pretty closely, adding ingredients here and there to use up tidbits in my fridge. It makes a hearty addition to a meal, thought I don’t think it is quite filling enough to be a main course. I did mix a bowl of leftover rice into my tonjiru the other day for a fairly filling lunch, however. I like to make this soup whenever I find some thinly sliced pork on sale at the market. The secret is to use a cut that is not too lean; very lean meat will tend to dry out and become tough in the soup. I also really love the daikon in the soup. I usually use about twice as much as the recipe calls for.

The Kyoto bean soup is from Japanese Light by Kimiko Barber. I am not sure if I’ve seen rutabagas at all at my local market, and certainly hadn’t on the day I made the soup, so I left them out, but added some potato and a bit of udo that had been in my fridge for too long instead. I also used a regular Gunma cabbage instead of the Chinese cabbage called for in the recipe, and used a yellow onion instead of the red onion since red onions aren’t available at most stores here. Finally, I topped the soup with both sliced green onions and mitsuba leaves. The soup was pretty tasty, but I had to add some extra soy sauce to get the flavor right. I think next time I will try to season it with more miso instead. I am also hoping to try making the soup with thin strips of abura age tofu instead of bacon for a vegetarian variation.

Miso-Thickened Pork and Vegetable Soup
Tonjiru
from Washoku by Elizabeth Andoh, copyright 2005

1 Japanese leek or small western leek, about 3 ounces
1/2 teaspoon vegetable oil
6 ounces boneless pork from loin or shoulder, cut into small, thin strips
1 small carrot, about 3 ounces, peeled and cut into julienne
1-inch chunk daikon, about 2 ounces, peeled and cut into julienne
5 to 6 inches burdock root, about 3 ounces, skin scraped off with the back of a knife and cut on the diagonal into thin slices
pinch of salt
splash of sake
2 quarts water
about 12 square inches of kombu
1/2 teaspoon soy sauce
1 block firm tofu, about 14 ounces, drained and pressed, then cut into 1/4-inch dice
1 small bunch mitsuba, trimmed, stems cut into short pieces, and leaves chopped
3 tablespoons mugi miso
3 tablespoons sweet, light miso, preferably Saikyo miso

(more…)